Do It Yourself With XMission Control
XMission has updated its control panel. “XMission Control” not only consolidates previous online tools but also adds new functionality to help you better manage your account. This initial blog post will touch upon a handful of key features. Future posts will delve deeper into these and other awesome elements.
If you haven’t already, we encourage you to access XMission Control at: https://xmission.com/control
Change or Reset Your Password
 In a recent article we talked about sane password management and provided guidelines towards both improved security and easier to remember and type passwords. XMission’s password policy and tools are designed in line with these recommendations.
If you’ve forgotten your XMission password you can go to the login page on XMission Control and choose the “Forgotten Password?” link to reset your password but note you must have access to the email address you have associated with your XMission account.
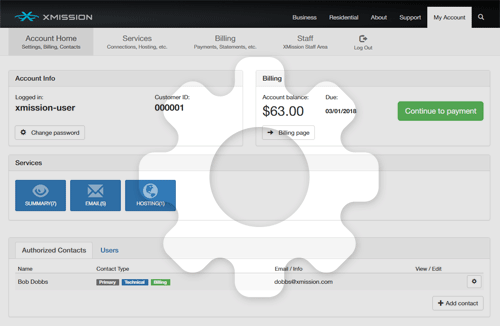
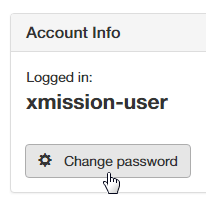
If you know your XMission password you can update it by logging into the panel and choosing the “Change Password” button in the “Account Info” section near the top left area of the page. A window will open and ask you for your current and new passwords. Within the window you’ll see an option for our “Password Generator,” which will enlarge the modal window and step you through the generation process.
Note that we no longer require upper case, special characters, and numbers but instead require at least 12 characters which simply cannot closely resemble a single word or known popular passwords. We recommend you smash together a few random words, perhaps using a special character between them.
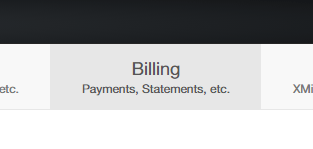
View Invoices and Pay Online
 Just to the right of the “Account Info” section is the “Billing” summary which displays your current balance, the due date, a link to a detailed Billing page, and a handy “Pay Now” button which automatically opens to a simple window allowing you to pay by credit card. Note that you can also toggle between auto and manual payments. For simplicity we recommend you choose to have XMission automatically charge your account to ensure you avoid any unwanted downtime.
The Billing page displays a summary of your most recent invoices. If you click the “ID” number you can open the detailed invoice and print it off to paper or PDF. Lastly, you can update the “Payment method” by choosing the drop down menu and “Enter new card.”
Review and Edit Account Contacts
 A new feature that’s never been available online before, you can now manage your own account contacts. Businesses will particularly appreciate this option since contacts management is key to securely controlling access to your XMission account.
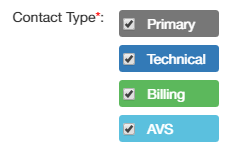
At the bottom of the Account Home page you’ll see the “Authorized Contacts” tab with a complete list of all contacts associated with your account. We strongly encourage you to keep your contact information up to date by updating email addresses or adding and removing people as necessary. To edit a contact choose the gear button to the far right of any contact. A window will open up with options to “Edit Settings” or “Delete” the contact. Note that every account must have at least one primary contact.
Need Assistance?
If you run into any difficulties, please visit our help pages.
In conclusion, we encourage you to login and make use of these and other tools we’ve made available online to give you the ability to better control your XMission account and services.
Media Release: Beyond Google Fiber—In UTOPIA Cities, XMission Launches The Fastest Residential Connection Available in the U.S. Inspiring Kids Doing Cool Stuff at U of U Science & Engineering Fair
Comments are currently closed.
When I try to log in with my username and password the page returns “User has no permissions.”
Jeff, sorry for that issue. Multiple contacts are associated with the account in a way that we’re not comfortable granting full access automatically. Please contact our support department to get full permissions associated with you.
In the old home/xmission my account I could see how much of my quota I was using. You had a nice pie chart for my email and my files. I don’t see that any more. How do I see how much of my quota my files are taking up?
Peter, sorry that we don’t have that available yet. If you use our Zimbra email product you can see your quota usage when logged in via your browser. Please stay tuned as we add more tools and such to the control panel over time.
Peter, I’ve learned from our tech support manager that user@xmission.com customers can login via their browsers to https://mail.xmission.com to access their mail quota. Once logged in you can see quota displayed in the middle of the display pane.
Thank you Grant. That works. It also looks like XMission increased the Mail quota on me while I wasn’t looking so I have no problem there. 🙂
As for my file data quota it looks like I can still log into my shell account and run “quota -s” to get my usage & quota. If I’m not mistaken the column labeled “space” is my actual usage.
Thanks again for all the work you do at XMission.
Peter, we have indeed increased the mail quota. You are also correct about reading your disk quota via shell. You’re very welcome.