XMission Labs: Speed Test Lab

Here I would like to show you how I was able to run accurate speed test results on a multi-gigabit connection. While this article was written with our 2.5Gb and 10Gb customers in mind, a lot of this advice will apply to anyone who wants to get an accurate speed test, so feel free to read on!
Before we get started, remember there are two key players involved whenever you run a speed test: the speed test client (the device you’re using to run the speed test), and the speed test server. Whenever you run a speed test, the speed test client talks to a speed test server to measure two things: how much data the server can send to the client (how fast your download speeds are), and how much data the client can send to the speed test server (how fast your upload speeds are).
It’s also important to remember that in order to get the most accurate speed test result, you want to remove as many potential bottlenecks between the speed test server (in this case, XMission’s speed test server) and the speed test client—the device you’ll be running the speed test from. Bottlenecks can be anything that could potentially slow down or interfere with the conversation between your speed test client and the speed test server—in other words, if there’s something between your client and the server that could meddle with the speed test, your speed test result is going to look slower than your connection really is.
Now our blog post mentioned some of the potential bottlenecks you might encounter, but you can lump these bottlenecks into three general categories: hardware, software, and latency.
Hardware bottlenecks are pretty straightforward: Is your speed test client using hardware that can support 2.5Gb or 10Gb connections? What about the speed test server? And how about every device between your client and the server? All of these devices must be connecting to one another at the same speed or higher, otherwise your speed test results are going to look much slower.
If you’re a 2.5Gb or 10Gb XMission customer, you can rest easy knowing that everything between your fiber device and XMission’s speed test server will have a connection of 10Gb or higher, so you only need to make sure your client device has the right hardware and is connecting at the right speed.
Software bottlenecks can be pretty tricky to define and think about so often fly under the radar, but consider: You use a program or software to run a speed test. When you visit speedtest.xmission.com to run a speed test, you’re using your Internet browser—and that’s software, baby! What software you use to run a speed test may give you more or less accurate speed test results, especially when it comes to multi-gigabit connections. On top of that, if your speed test client is running other software while you’re running a speed test, then you will get slower speed test results. If you want to get the most accurate speed test results, make sure to close any other programs or software running on your speed test client before you start your speed test.
Last is latency—this is a measurement of the time it takes a message from one device to cross a network before it’s received by the other device, and is usually measured in milliseconds. Broadly speaking, two devices that are geographically close to each other will have lower latency, and two devices that are geographically farther apart will have higher latency. All this means is if you’re in Utah and run a speed test to a speed test server in Georgia, it’s going to take a little more time to send data from Utah to Georgia (and vice versa) because the latency is going to be higher than sending data to a server in Utah. So, your speed test results will be slower as a result.
So putting it all together: In order to get an accurate speed test result, make sure you’re using hardware that can connect at the right speed, you’ve closed all non-speed test programs on your client and are using the right speed test software, and you’re choosing a speed test server that’s geographically close to you that has low latency. Next I’ll show you how I ran speed tests in XMission’s lab and what steps I took to get accurate 2.5Gb and 10Gb speed test results—follow along and you can get them, too!
Topology:
While our lab doesn’t use the exact fiber device you may have installed in your home, everything else is set up to mirror the same path on our network that our customers will take when connecting to our speed test server.
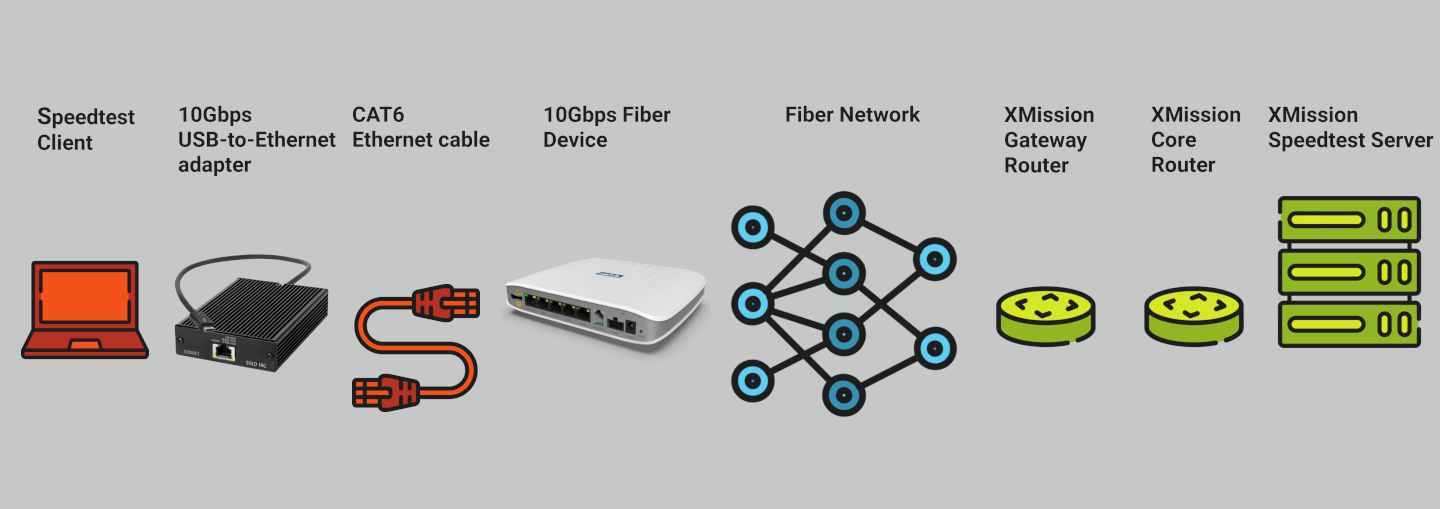
You might notice in that diagram I’m connecting my speed test client (my laptop) directly to the fiber device—there’s no WiFi router involved. Normally your WiFi router should be connected to the fiber device, but if you want the most accurate speed test results, I highly recommend removing your WiFi router and plugging your speed test client directly to the fiber device with a CAT6 Ethernet cable.
Yes, that means no WiFi is involved. You will not get accurate speed test results when connecting over WiFi.
For these tests I’m using a refurbished HP laptop running Windows 11 as my speed test client. (We’ve gotten excellent mulit-gig speed test results on Apple and Linux devices). This laptop does not have an Ethernet port on it, but it does have Thunderbolt 3 ports (these look like USB C ports, but with a little lightning bolt on them). I’m using a USB/Thunderbolt 3-to-Ethernet adapter so I can connect my laptop to the fiber device with an CAT6 Ethernet cable. I’m using this 10Gb Ethernet adapter.
So, I have a laptop connecting to a 10G USB-to-Ethernet adapter, connecting to a CAT6 Ethernet cable, connecting to the 10G Ethernet port on our lab’s fiber device. All the hardware I need to worry about is 10Gb-capable, so there are no hardware-related bottlenecks. But it’s easy to get cocky, so let’s double-check the laptop is really connecting at 10Gb by checking my networking settings.
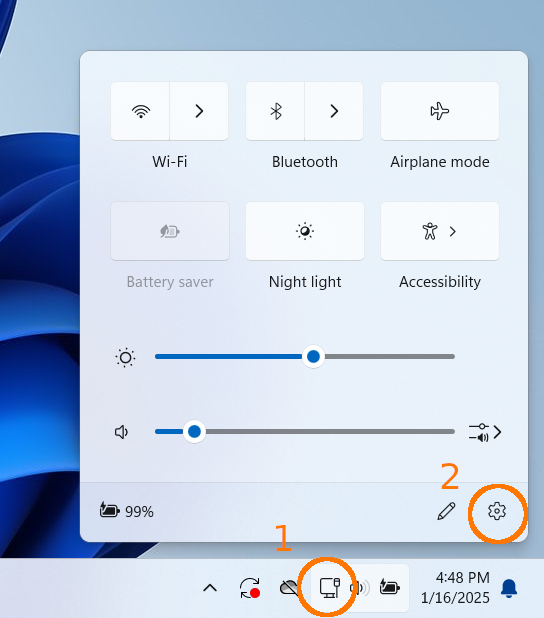
Click on the networking icon on the taskbar in the bottom-right (1), then click on the gear in the pop-up (2).
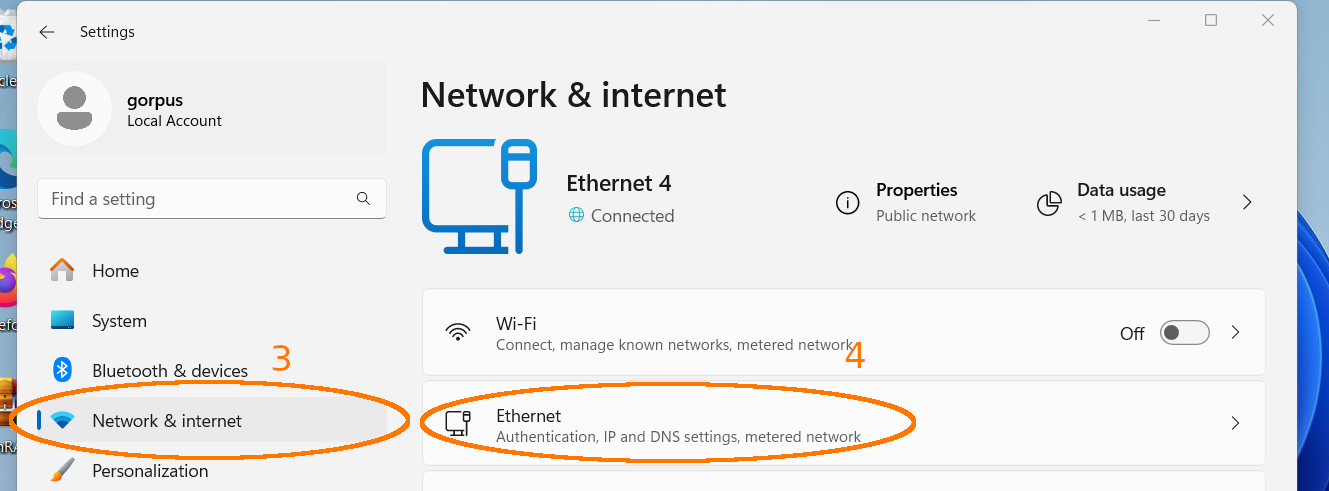
This will bring up a new Settings window. Click on “Network & internet” (3), then click on the “Ethernet” option (4). This will show you details about your Ethernet connection, including the Link Speed.
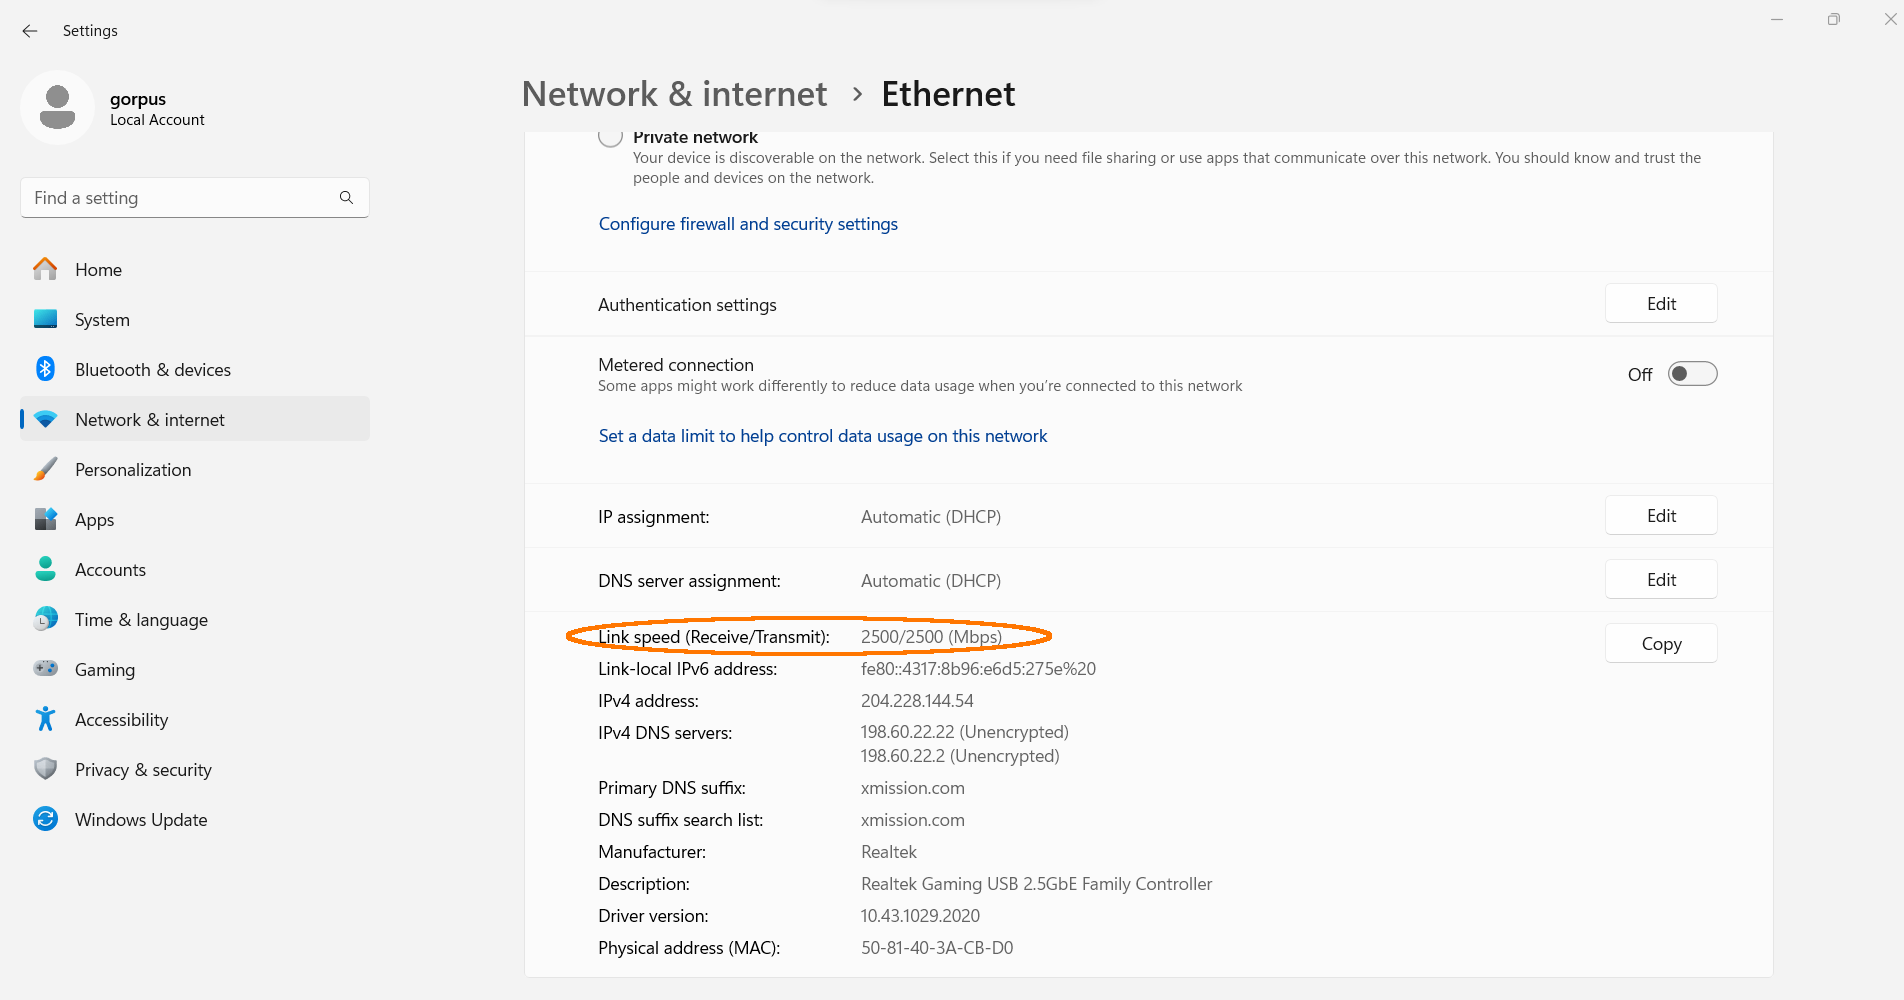
Hey wait a minute! My link speed is only 2.5Gb (or 2500Mb), not 10Gb! It turns out I accidentally connected my 2.5G USB-to-Ethernet adapter instead of my 10Gb USB-to-Ethernet adapter! Good thing I double-checked 🙂
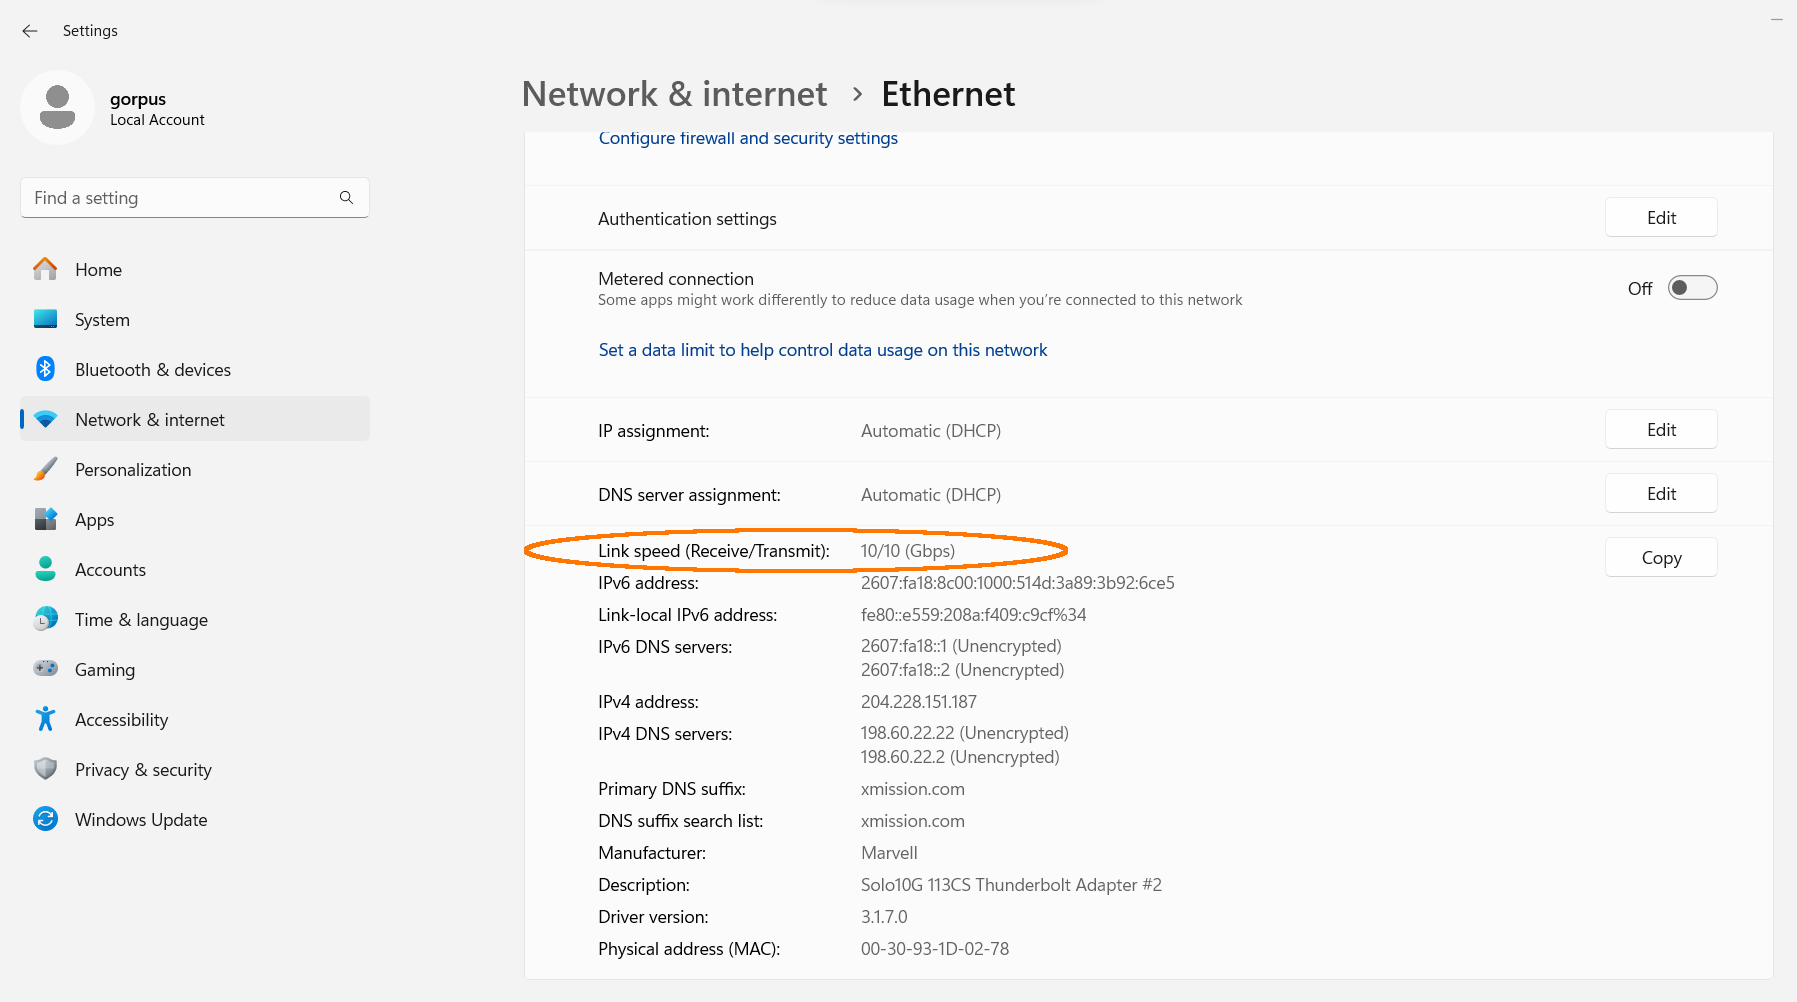
There, I connected my 10G Ethernet adapter and can now confirm I’m really connecting at 10Gb now. Let’s pull up speedtest.xmission.com in my browser and test these speeds!
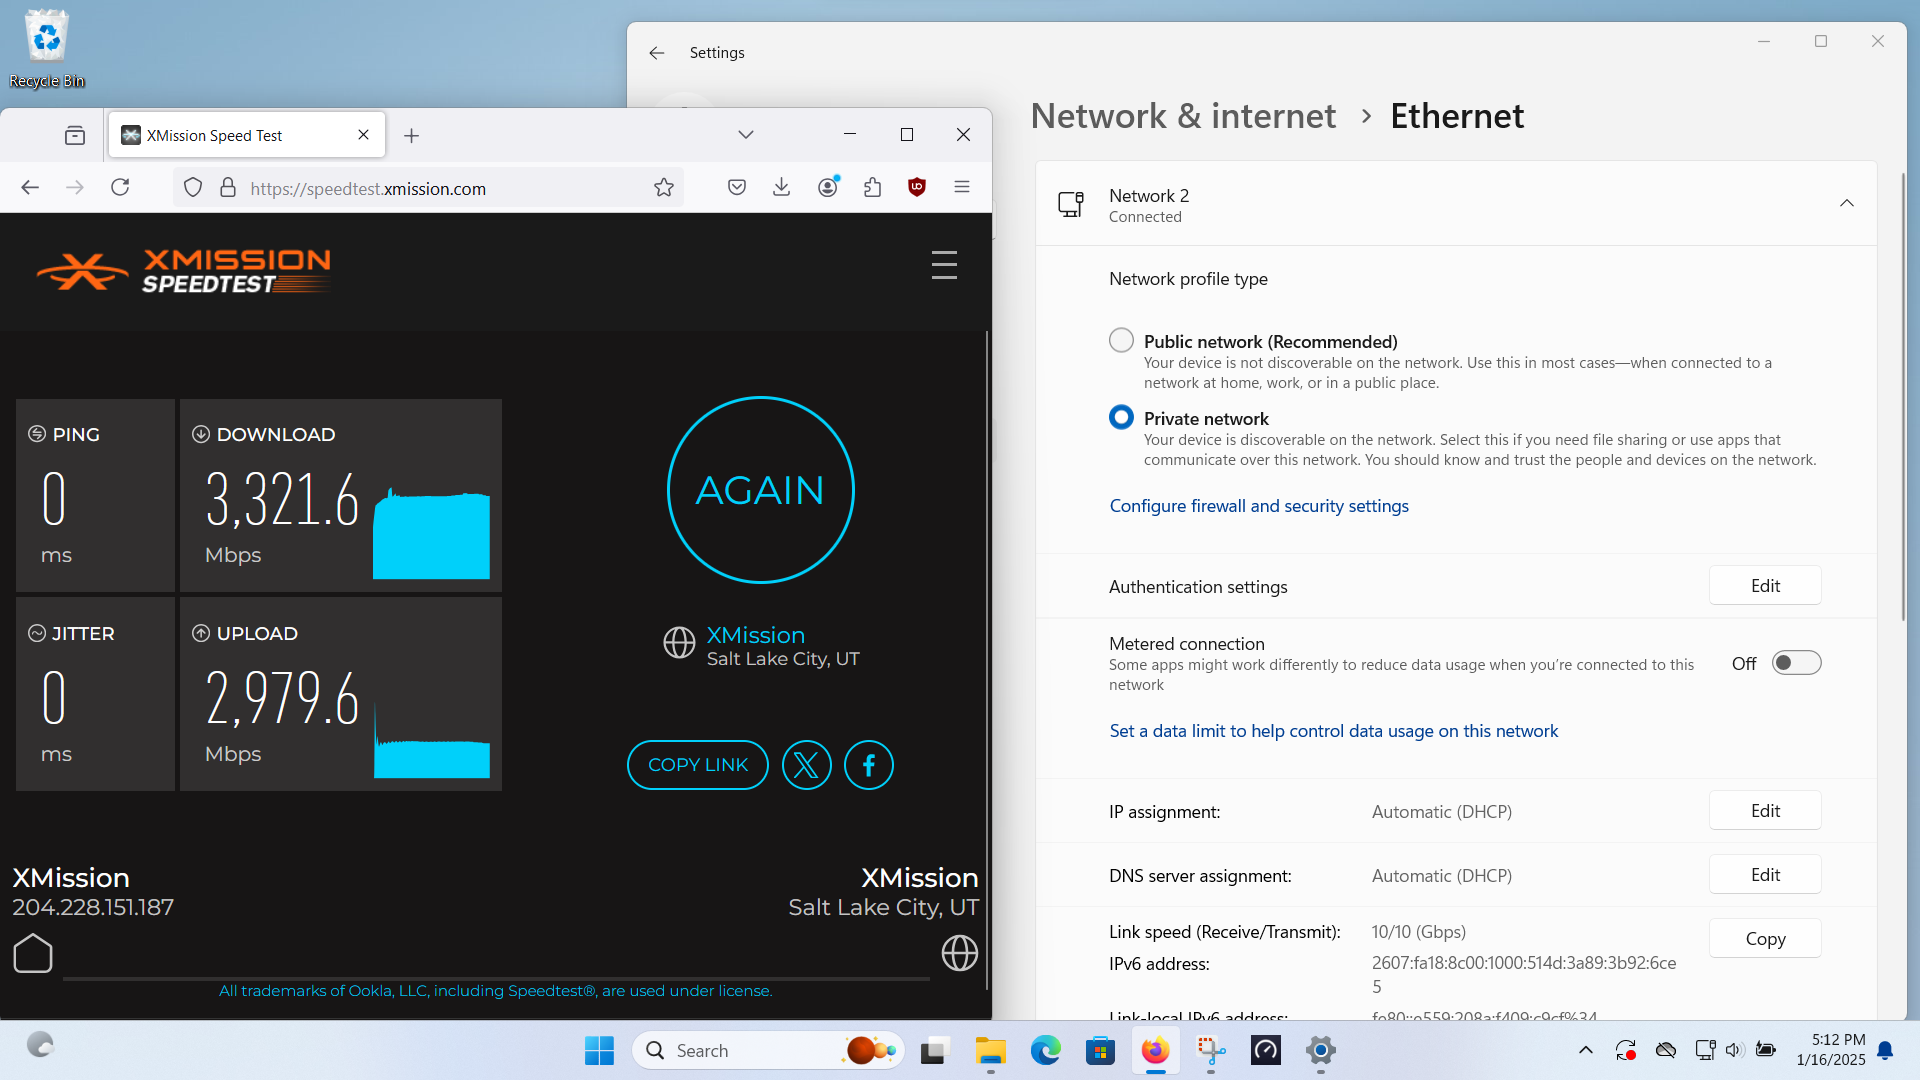
Wait, I can’t even break 4Gb upload and download? But I’m using a 10G Ethernet adapter and connecting at 10Gb, so what gives?
So here’s our first software bottleneck: Internet browsers (Firefox, Chrome, etc.) can’t really handle the data transfers needed for multi-gig speed tests so your speed test results when using a browser will usually be under 4Gb—not very accurate at all! Let’s try testing our speeds with a different kind of software: iPerf3! This is a command-line software you can use for testing your network speeds. Here’s how you install iPerf3 and run it on Windows 11:
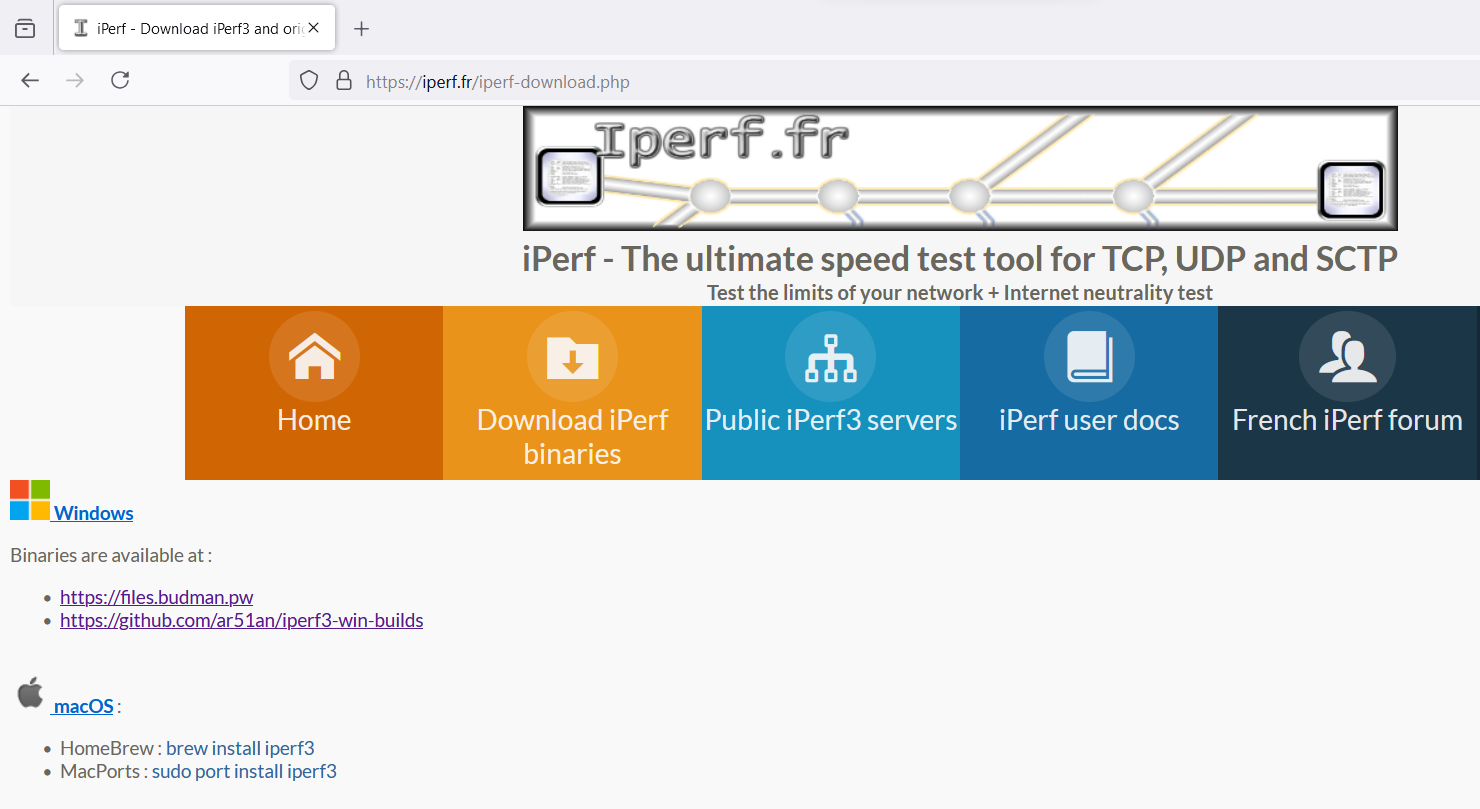
Go to iPerf3.fr and click on “Download iPerf binaries”, there should be two options you can click on for Windows—I’m using the first link, but both work.
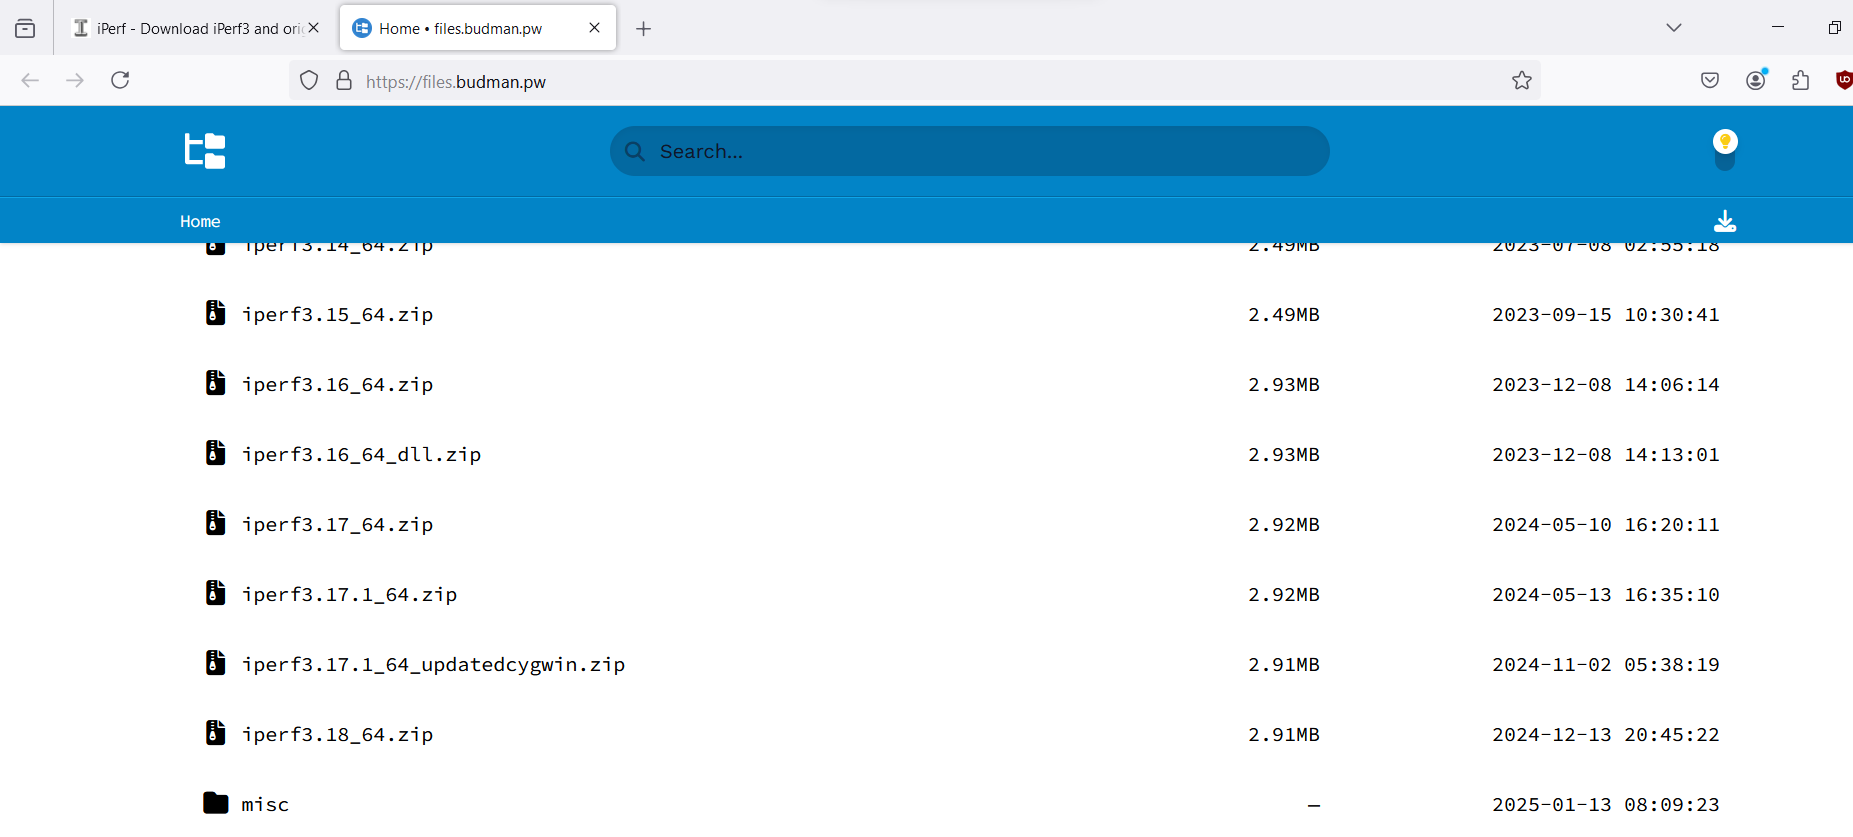
Scrolled to the bottom and selected the latest version of iPerf3—version 18_64.

Once it’s finished downloading, go to your Downloads folder, you should see a .zip file called “iPerf3.18_64.zip”. You’ll need to extract the files first. You can use your favorite software to do this, or follow this guide. Once you’ve unzipped the contents, you should have a new folder in your Downloads directory called “iPerf3.18_64”
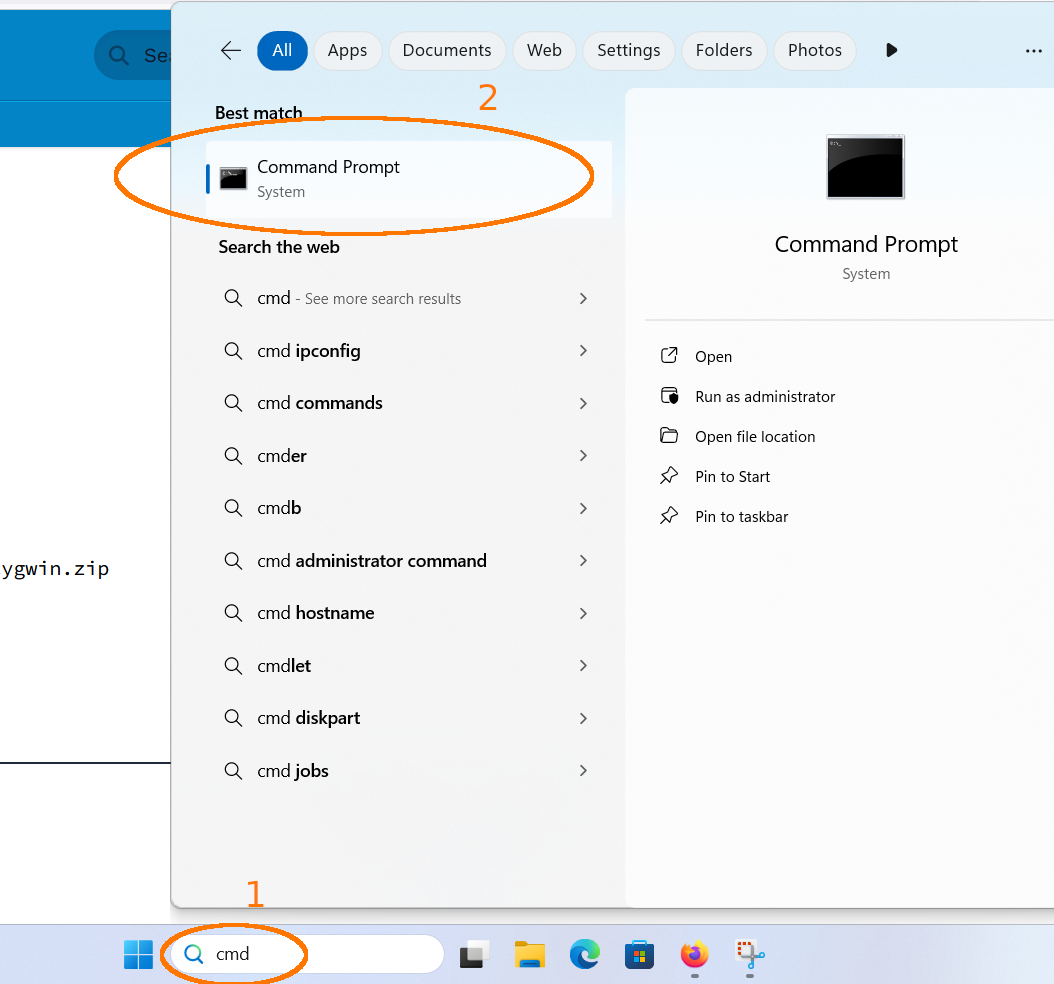
Now to run the iPerf3 software, you’ll need to use the text-based command prompt. You can open a command prompt window by typing “cmd” in the Windows Search Bar (1), and then clicking on the “Command Prompt” option (2). This will open a black window with white text in it.
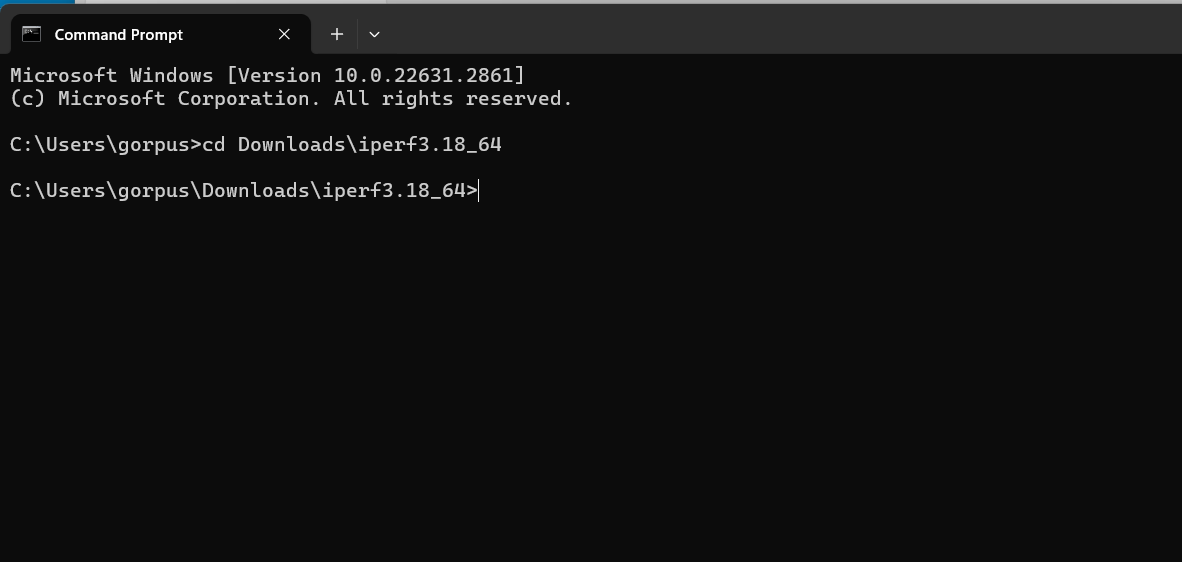
Next you’ll want to get to the iPerf3.18_64 folder that’s in your Downloads folder. To do this, just type “cd Downloads\iPerf3.18_64” then press “Enter”. Now we’re ready to run an iPerf3 speed test!
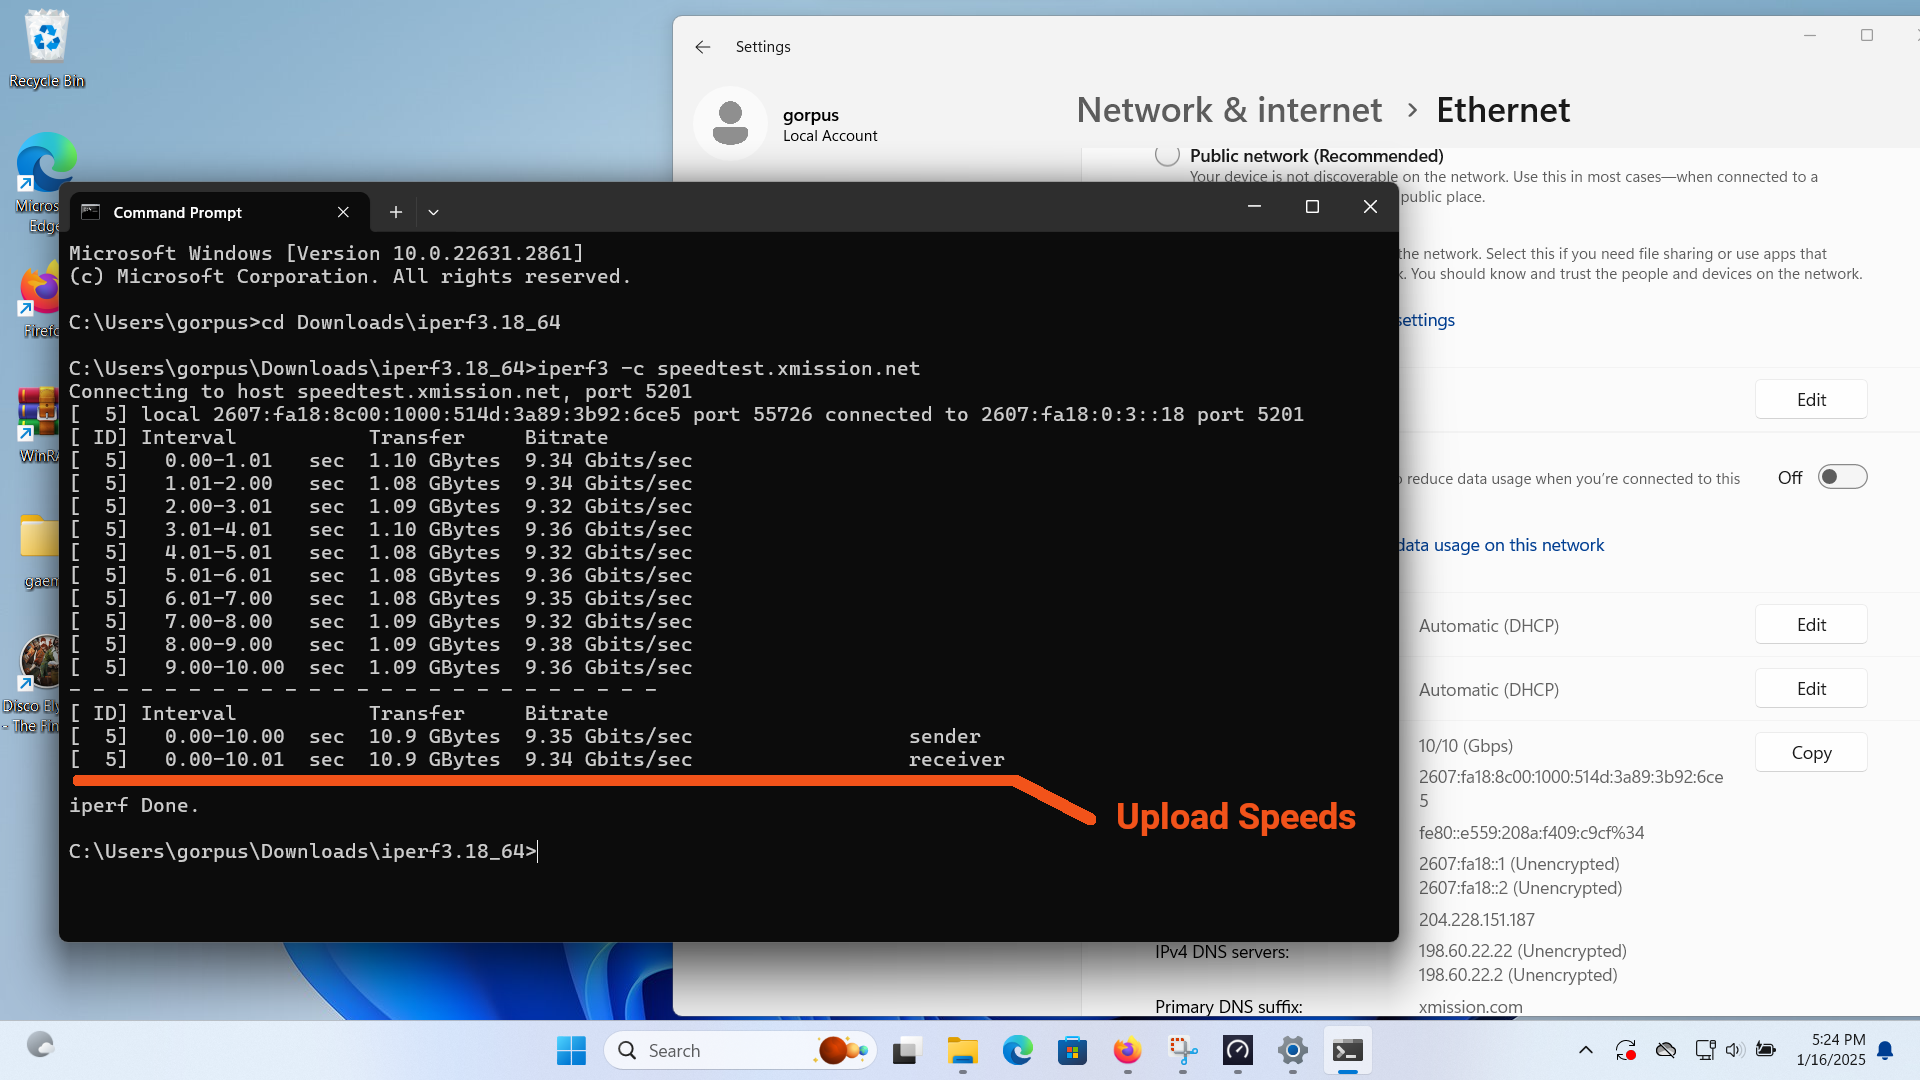
You run the speed test by typing the command “iperf3 -c speedtest.xmission.com” then pressing “Enter”. What iperf3 is doing is contacting the speed test server “speedtest.xmission.com” and sending it as much data as it can for ten seconds, then it measures how fast your connection is by calculating how much data your client was able to send in that time. After waiting a few seconds the speed test will finish—you’ll want to focus on the last lines at the bottom and look at the numbers under the “Bitrate” column. Here you can see my laptop was able to get 9.35Gb upload speeds on a 10Gb connection—much faster than the results I got from my browser! This is a very accurate and old-school way of checking your speeds.If you want to test how fast your Download speeds are, type the command “iperf3 -c speedtest.xmission.com -R” then press “Enter”—this command reverses the test, making the speed test server send data to your client.
If you’re in Colorado or Montana and want to run a multi-gig iPerf test, XMission has iPerf servers in the Southern Ute Nation and Bozeman respectively. If you want to run a test against these servers, make sure to use the following commands:
For the Southern Ute server: iperf3 -c iperf.soute.xmission.com
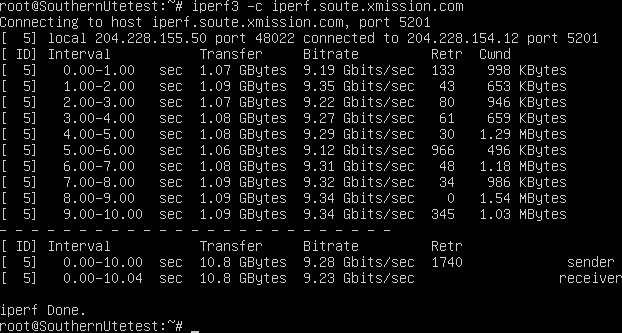
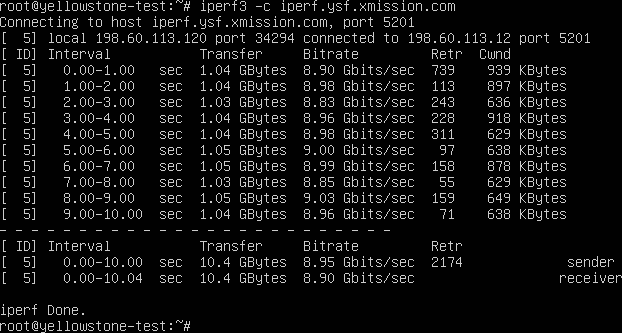
For the Yellowstone Fiber server: iperf3 -c iperf.ysf.xmission.com
Now if you’re not a fan of the command prompt, there’s another way to run a speed test without using a browser: Ookla’s Desktop App. Download it from their website. If you’re like me and can’t/don’t use Microsoft’s App store, you can download the Windows 7 version directly from their website, it works exactly the same
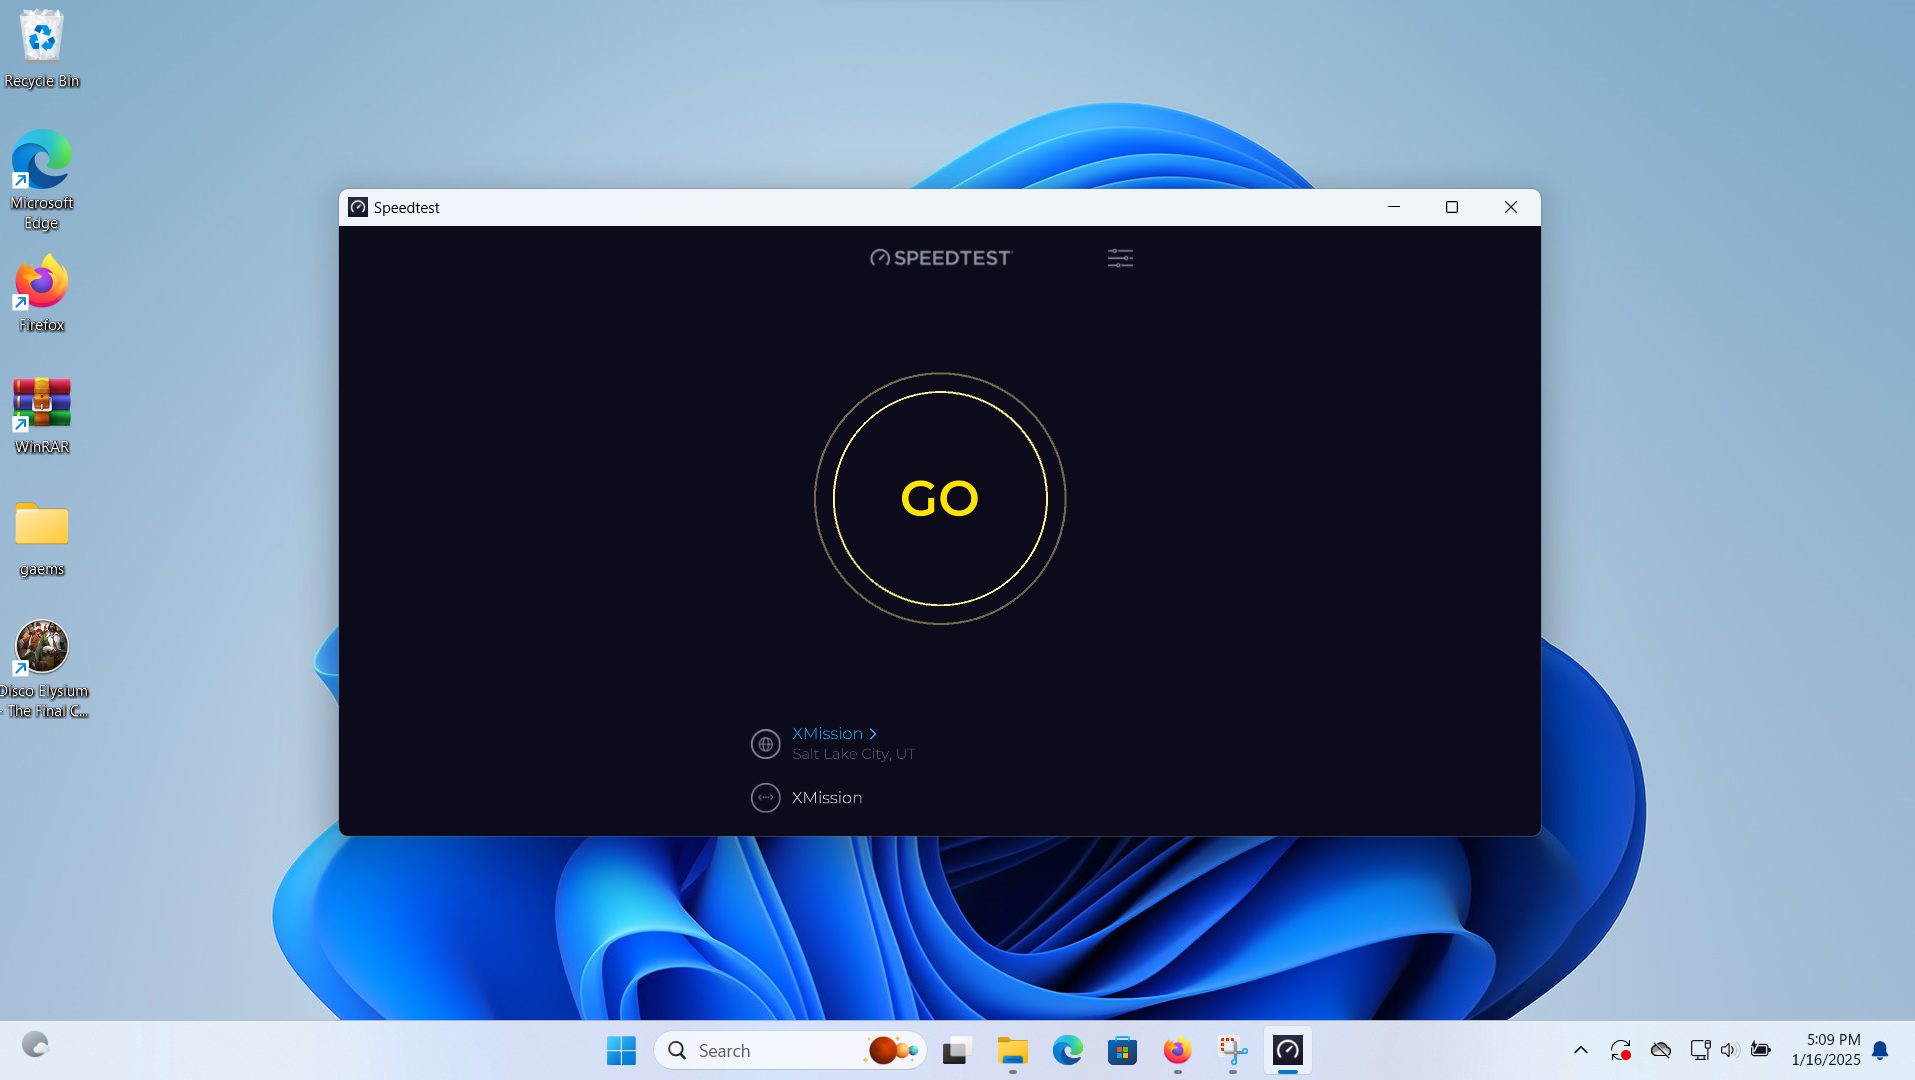
Now, the Ookla Desktop App can look very similar to running a speed test in your browser, but don’t be confused! The desktop app is a completely different software than your browser, and is programmed specifically to handle the data transfers used in multi-gig speed tests.
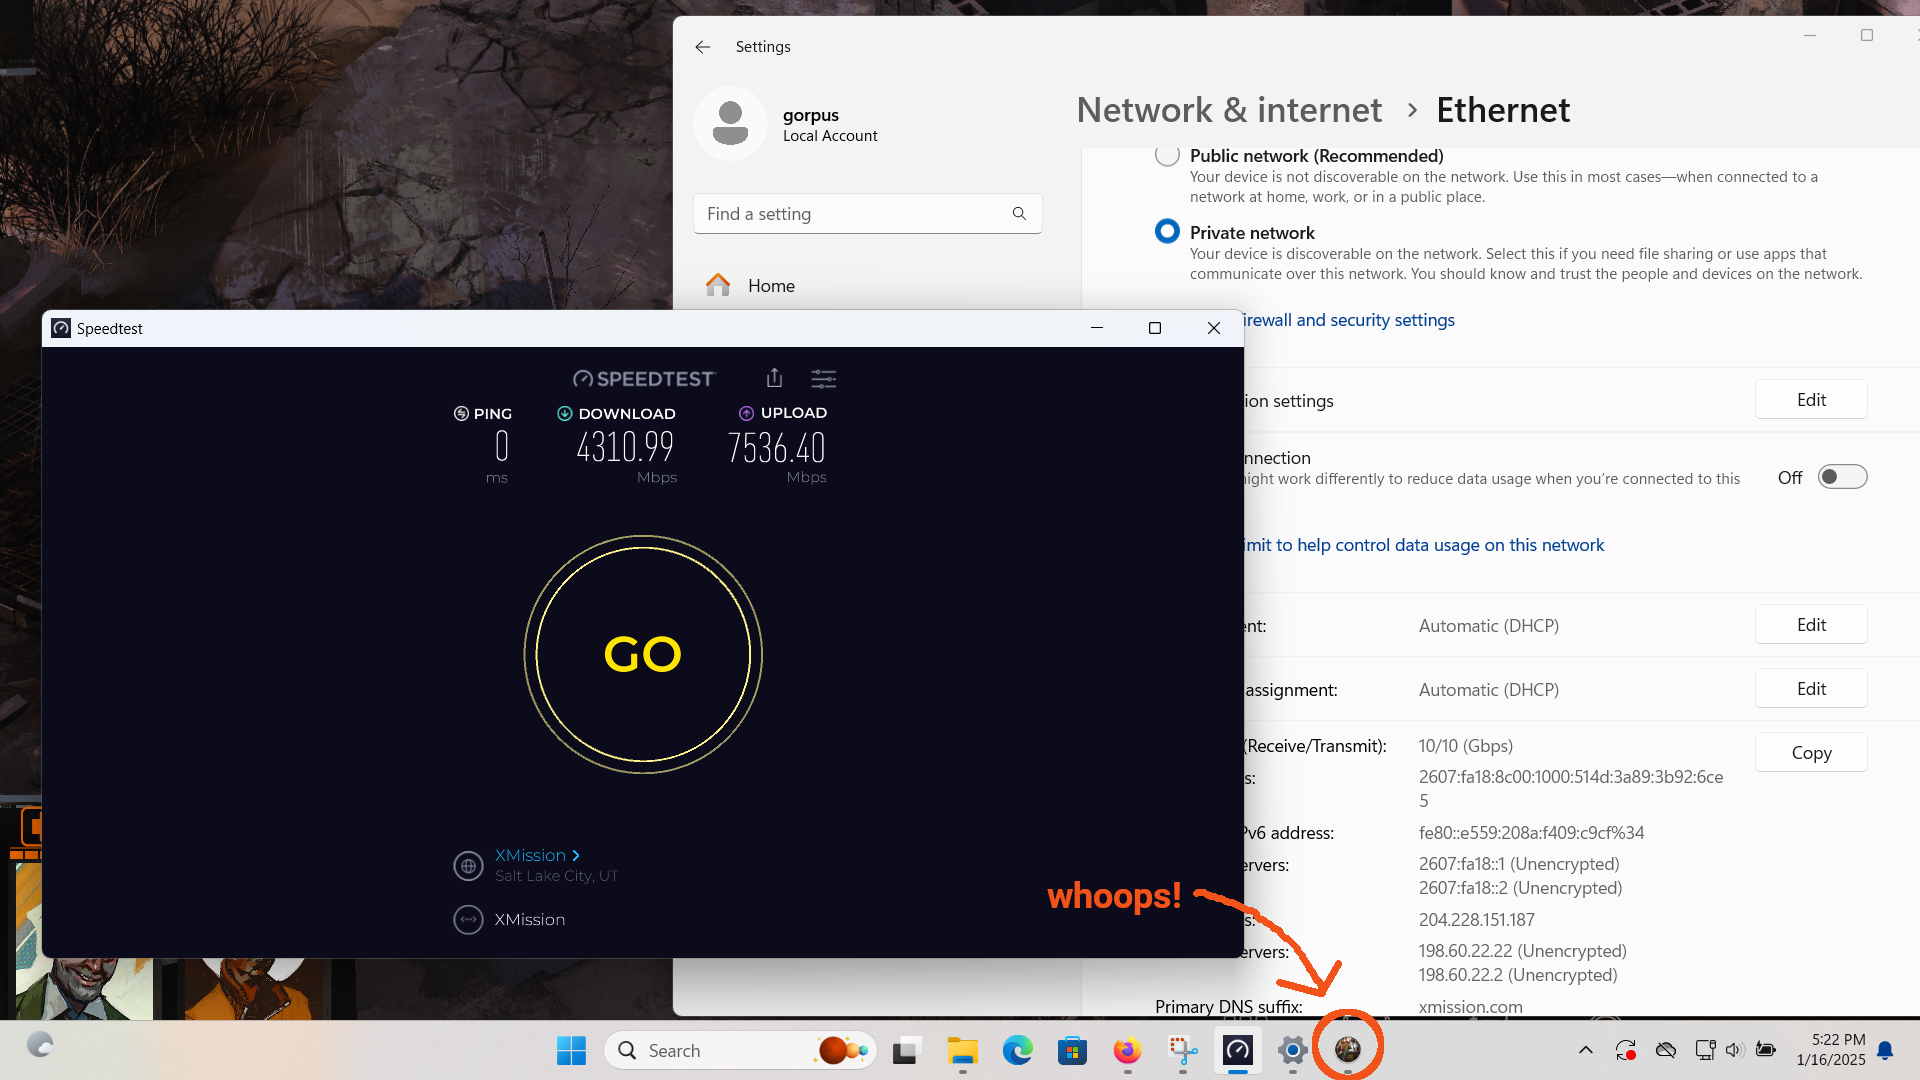
And there you go! That’s what an accurate multi-gig speed test looks..hey, wait: only 4.3Gb download and 7.5Gb upload??? But I’m connecting at 10Gb what gives?
Ohhh that’s right: I got bored writing this guide and started playing a game on my laptop, then forgot about the game and then ran the Ookla Speedtest App while my game was still running on my laptop.
So here’s your reminder of another potential software-based bottleneck that can lower your speeds: other software! Running a multi-gig speed test can take up a lot CPU processing power, and all software have to share that processing power among themselves. If you have a lot of other programs, apps, or other software running while you’re doing a speed test, your speed test results are going to look bad because your CPU is busy multi-tasking and can’t 100% focus on just your speed test software. Make sure to close all software, apps, and programs on your speed test client before running a speed test. Some programs run in the background and can’t easily be closed, so you can also try booting your Windows machine into Safe Mode with Networking Enabled and running a speed test there for the most accurate results.
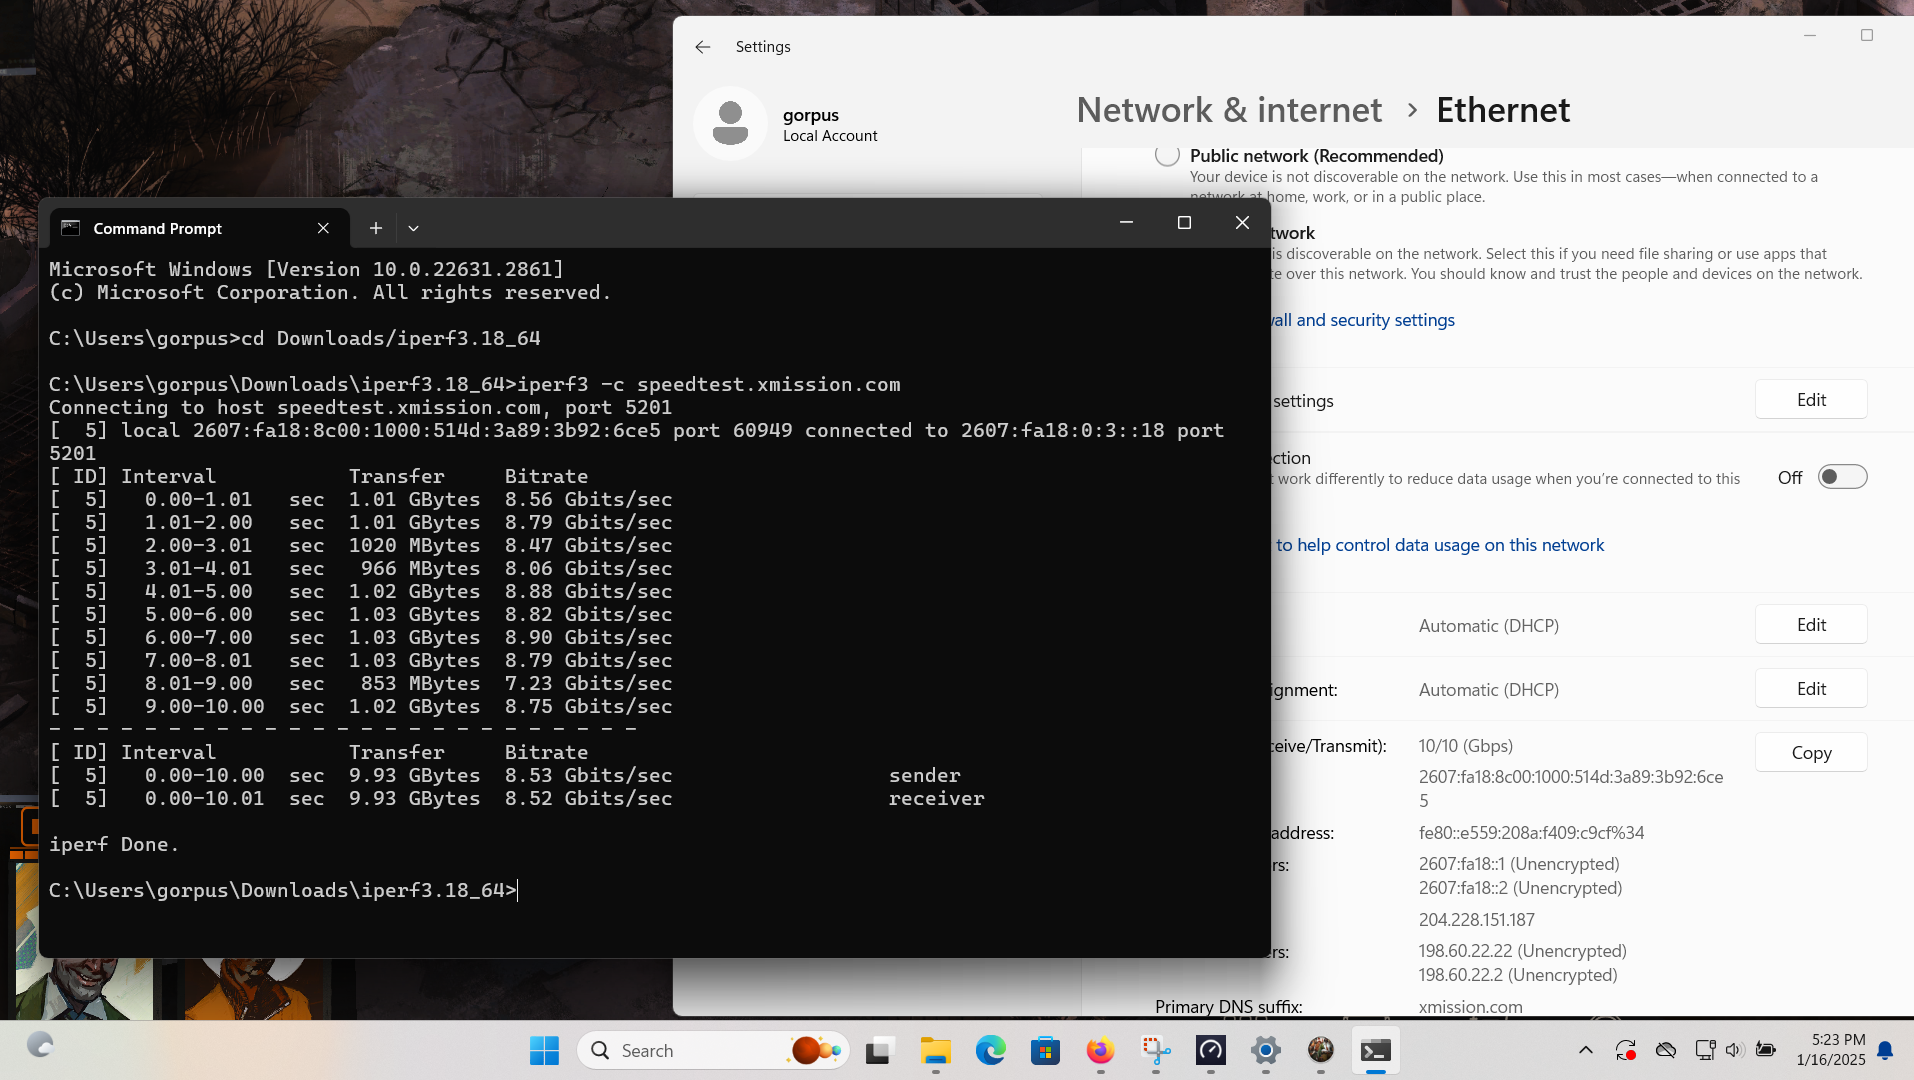
But I don’t really want to close my game just yet, and I’m not really convinced the game is really slowing down my speed test results. Let me run another iPerf speed test real quick:
Well, 8.5Gb upload is better, but that’s almost 1Gb slower than the iPerf test I ran before I started playing my game. I guess my game is slowing down my speed test results after all. Let’s close my game and try running another speed test with the Ookla Desktop App.
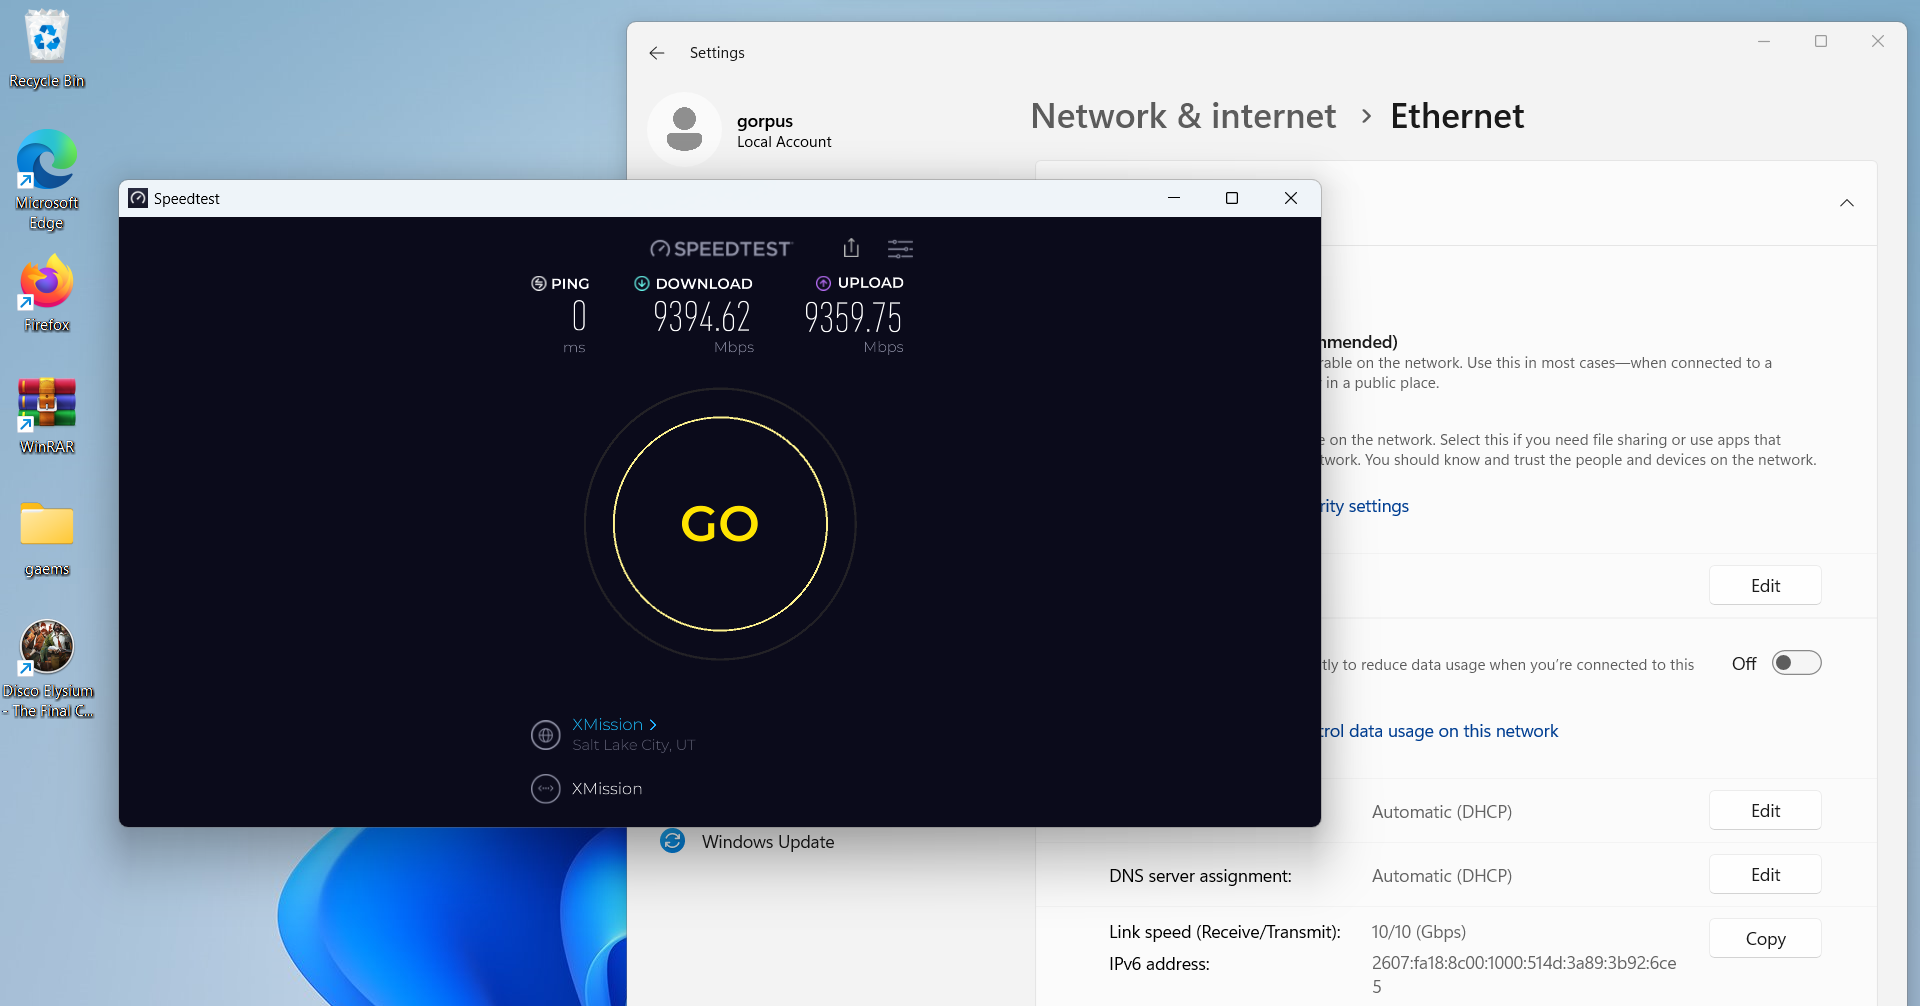
That’s much better!
These speed test results are very similar to the ones I got when running an iPerf test—9.3Gb download, 9.3Gb upload. Now that’s what you want to see in an accurate speed test!
Anatomy of Multi-gig Speed Testing Let’s Talk Phishing—Part 3: When Scammers Pose as XMission
Comments are currently closed.