How to add a contact form to your WordPress website
 A contact form is the most straight-forward and ubiquitous way for your website visitors to send you comments and information. WordPress does not offer a native form tool, so this job calls for a plugin.
Mandatory disclaimer: DO NOT INSTALL UNTRUSTED PLUGINS! Malicious plugins can compromise your website and destroy your data! I strongly suggest avoiding plugins with less than 5,000 installations and less than 4 stars. In the case of this article, I have vetted the Contact Form 7 plugin since 2012 without incident. I am in no way affiliated with the author of this plugin; I just like that it is straightforward, flexible and suits my needs as a developer. With that out of the way, let’s get a contact form set up!
Login to your WordPress admin (typically www.yoursite.com/wp-admin) and click on Plugins then Add New in the left hand menu. In the search field top right, enter “Contact Form 7.” It should look like this:

To install, click Install Now then Activate after the installation completes (usually a matter of seconds).
After Contact Form 7 is installed and activated, Contact will appear in the left menu. Click it, then Add New. You’ll see something just like this:
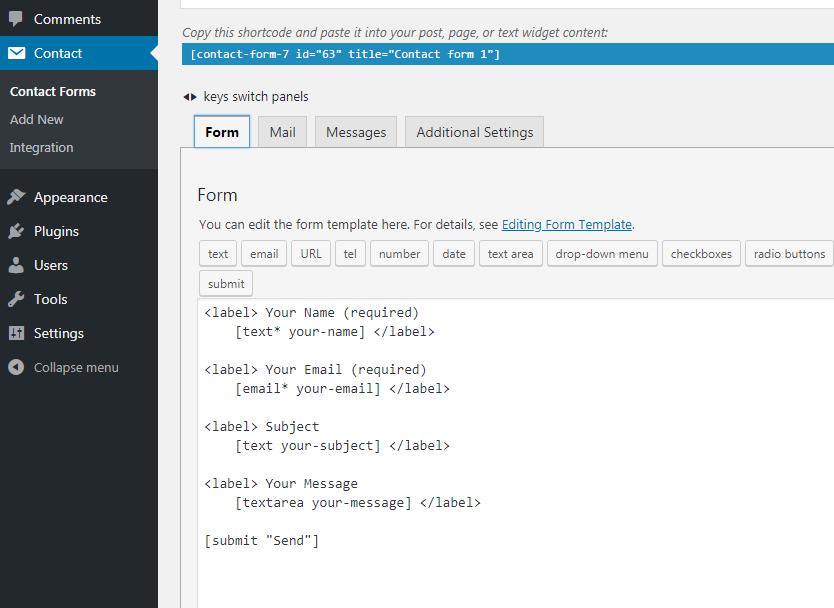 The default form is pretty useful as-is, or you can tweak it to suit your needs. There is an Editing Form Template help page, or create your own form by using the buttons at the top of the form edit window. If you’d like to customize your form by hand, read the Advanced Tips.
From the same page you are on, click the Mail tab to set up how your form will send emails to you.
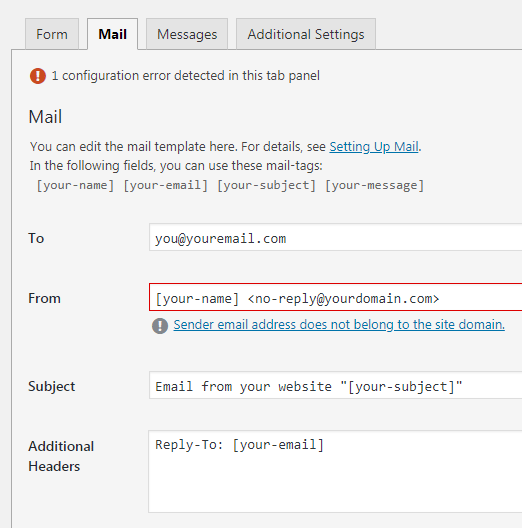
First and most important, who do you want the email sent To? Enter your preferred address for receiving emails from this form.
Next, who will the email be sent From? It’s being sent from your website, but all emails need a valid sender address. This email address cannot be the same as the “To” address you entered above. I suggest no-reply@yourdomain.com where yourdomain.com needs to be the domain your form is on. In the screenshot you’ll see an error is displayed because the example email address <no-reply@yourdomain.com> is not valid.
The Subject field sets the subject of the email your form will send. “[your-subject]” will be whatever was entered in the form field [text your-subject].
Additional Headers is really handy for setting the Reply-to [your-email] to whatever your visitor entered in the [your-email] field of the form.
At the top of the page (see the Step 2 screenshot) you’ll notice the text “Copy this shortcode and paste it into your post, page, or text widget content:. That’s exactly what you need to do now. Click the shortcode to highlight the text and CTRL-C to copy it. Now navigate to the page or post you want the form to appear on.
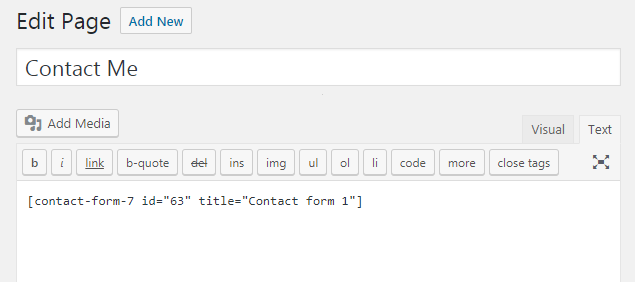
Place the cursor where you want the form to appear and press CTRL-V to paste the shortcode. Publish/save the page and you are DONE! Your form should look something like this:
 The exact appearance will be determined by your theme.
There’s one last thing you’ll want to do before you break out the champagne: Test your form by sending a test to yourself. If you reply to your test email, you can have an endless conversation with yourself!
Like this tutorial? When you buy a hosting package from XMission for your WordPress site, our support team will share other tips and tricks while helping you keep your site running flawlessly. Visit our hosting page for more details.
After GDPR Is Domain Privacy Still Necessary? Media Release: XMission Recognizes its 10,000th Subscriber on UTOPIA Fiber
Comments are currently closed.